First Looks: Arriving at a Malibu Property After a Leak or Storm
Inspection is where restoration begins to make sense. In Malibu, where a home might cling to a hillside above Latigo Canyon or sit a surfboard’s length from the tide at Broad Beach, the first few minutes on site matter. I start by listening—to the story of what happened, to the thrum of a running supply line that should be silent, and to the muffled drip you can sometimes hear behind a wall. Then I scan for safety: shut off water if needed, confirm power is safe, and ensure walking paths won’t spread moisture or track debris across sensitive finishes. Those early decisions set the tone for a thoughtful, precise assessment that respects both the urgency of the moment and the character of the home.
Malibu’s weather leaves clues. Salt haze on window hardware, wind-driven rain patterns on stucco, and sand caught in door tracks all narrate how water might have entered and where it traveled. Before a single tool comes out, I map the story the house is already telling. That narrative approach is key to avoiding unnecessary demolition and to quickly targeting the true source of trouble.
Interview and Timeline: What, When, and Weather Conditions
Good inspection starts with good questions. When did you first notice the issue? Was there a recent storm, a plumbing change, or unusual household activity? Did you run space heaters, dehumidifiers, or fans? In Malibu, direction of wind during a storm often dictates whether the leak came from the ocean side or was driven into a canyon-facing wall. If a neighbor’s gutter overflowed uphill from you, runoff may have pooled at a spot you’d never expect in fair weather.
Documenting a timeline creates a framework. If the event started within the past 24–48 hours, drying goals and containment needs may differ from those when moisture has lingered unnoticed in a second home for a week. A clear timeline also streamlines insurance conversations later on.
Exterior Walk: Rooflines, Flashing, and Drainage
Outside, I move from high to low. On tile roofs common in Malibu, I look for displaced tiles, cracks, and signs of underlayment fatigue. Around chimneys and skylights, I check flashing integrity and sealant condition, focusing on areas exposed to lateral wind. Gutter systems and scuppers come next; in a city where seed pods and salt-slick grit collect quickly, even a small clog can cascade into interior leaks. I note where downspouts terminate and whether water is directed decisively away from the foundation.
At decks over living spaces, I inspect membranes, terminations at stucco, and post bases. Soft spots or hairline splits near edges suggest water is working beneath the surface. On oceanfront lots, I also look for salt crusting and corrosion at rail hardware, which can hint at frequent wetting and drying cycles that stress nearby waterproofing details.
Openings and Envelopes: Windows, Doors, and Sliders
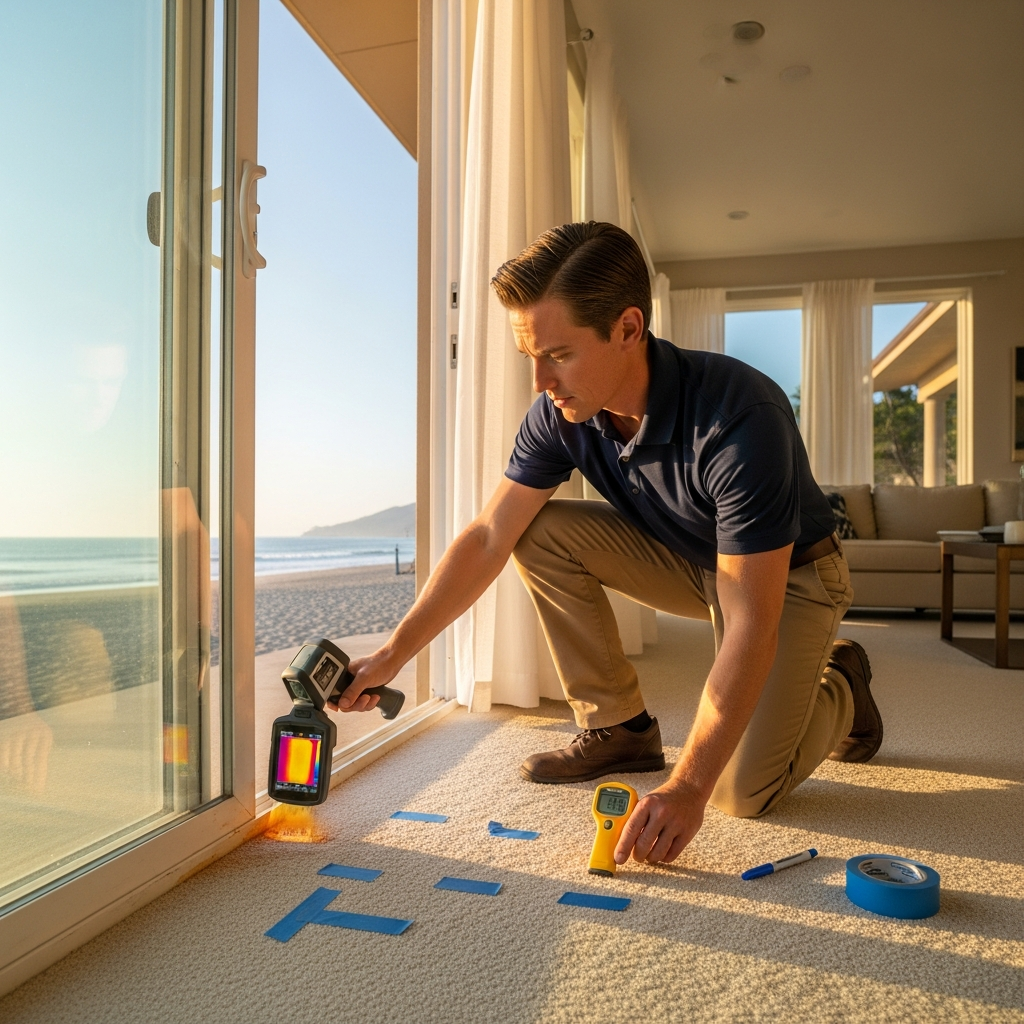
Large sliders frame Malibu views—and frequently test waterproofing. I examine tracks for standing water, confirm weep holes are open, and check weatherstripping for compression set. Threshold pans, if present, should have visible back dams, and the surrounding finishes should show no staining or swelling. For windows, I test operation and look for salt buildup that may be blocking designed drainage. Any sign of water staining below or lateral to these openings is a clue to track during interior mapping.
Door thresholds that sit close to exterior decks deserve special scrutiny, especially where slope is marginal. Even a minor change in deck elevation from seasonal expansion can encourage water to push inward during a downpour. Those observations steer the interior portion of the inspection.
Interior Survey: Following the Water’s Path
Inside, I start at the obvious—visible stains, damp flooring, or swelling trim—and then follow gravity and capillarity. Water loves to find shadow lines: the seam where a baseboard meets drywall, the joint where a tile meets a threshold, the path of least resistance along framing members. I look and feel, but I also measure. A quality moisture meter, used with a consistent technique, is the backbone of any Malibu inspection. I take baseline readings in unaffected areas, then move systematically through suspect zones, marking elevated areas with painter’s tape and notes.
Thermal imaging adds context. Cold spots can reveal evaporative cooling from dampness behind a wall or under a floor. In homes with radiant heat, I cross-check to avoid confusing warm pipes with “dry” areas. The goal is a map—visual and numeric—that shows where moisture is, where it’s moving, and what materials it’s affecting.
Crawl Spaces and Subfloors: The Hidden Reservoirs
Many Malibu homes ride above grade, leaving a crawl space that can hide a surprising amount of moisture after storms or leaks. I enter with care, checking for standing water, damp soil, and signs of persistent humidity such as rust on nails or mold on joists. The presence and condition of a vapor barrier is critical. If the barrier is torn or incomplete, moisture from the ground can feed a slow, steady rise in indoor humidity, which complicates drying in the living space above.
In slab-on-grade homes, I consider slab cracks and cold joints as potential pathways. Efflorescence on the floor or base of walls tells me water has been migrating for a while. Meter readings along the base of walls help confirm whether seepage is isolated or part of a broader groundwater or drainage issue.
Material Identification and Salvage Strategy
Every Malibu home has its own material palette—wide-plank oak, Venetian plaster, artisan tile. During inspection, I catalogue finishes and their sensitivity to moisture. Engineered floors tolerate certain moisture swings better than solid planks; plaster may handle controlled drying gracefully but can craze if rushed. Cabinet toe kicks and MDF moldings are particularly vulnerable and often guide decisions about removal versus dry-in-place strategies.
Salvage potential informs the plan. If hardwood shows mild cupping but moisture content is only moderately elevated, I’ll propose balanced dehumidification and airflow rather than immediate removal. If drywall paper is saturated behind a baseboard, I may recommend targeted access holes to encourage cavity drying with minimal disruption.
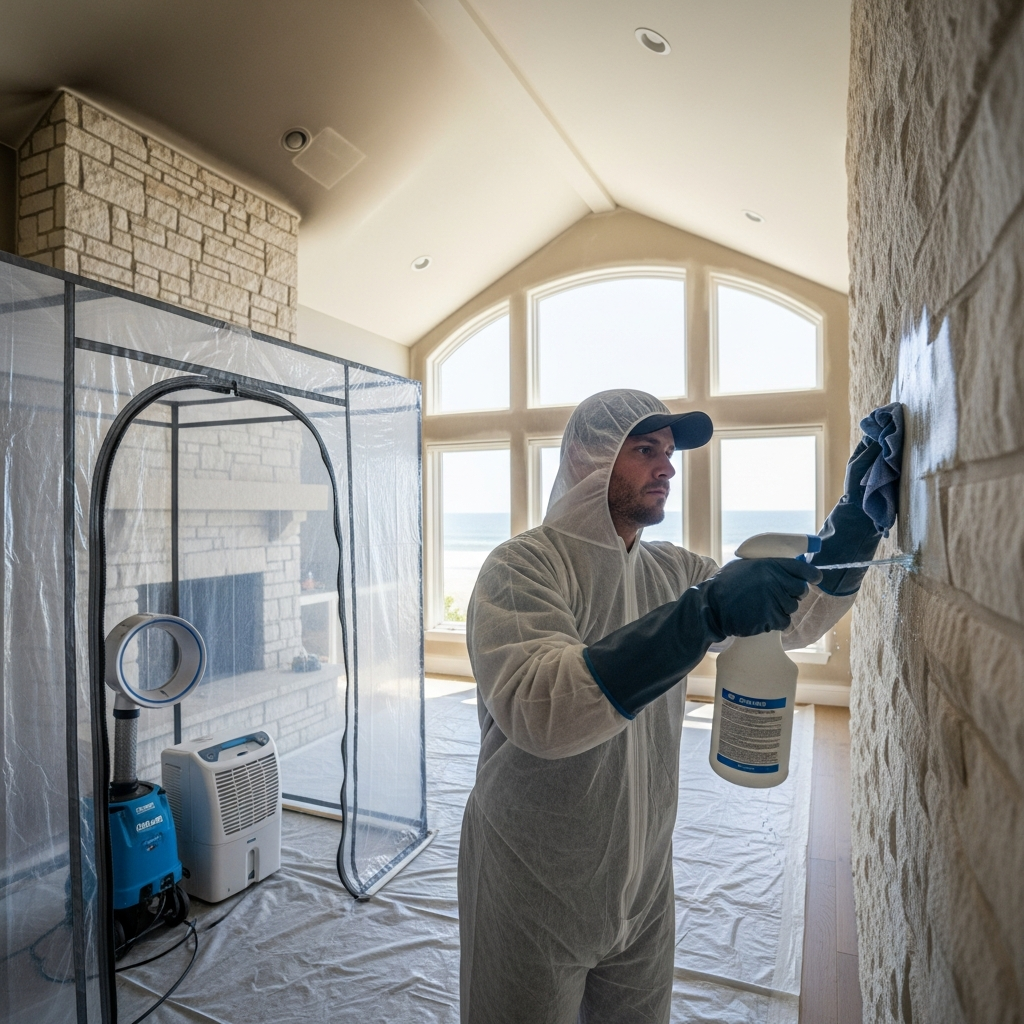
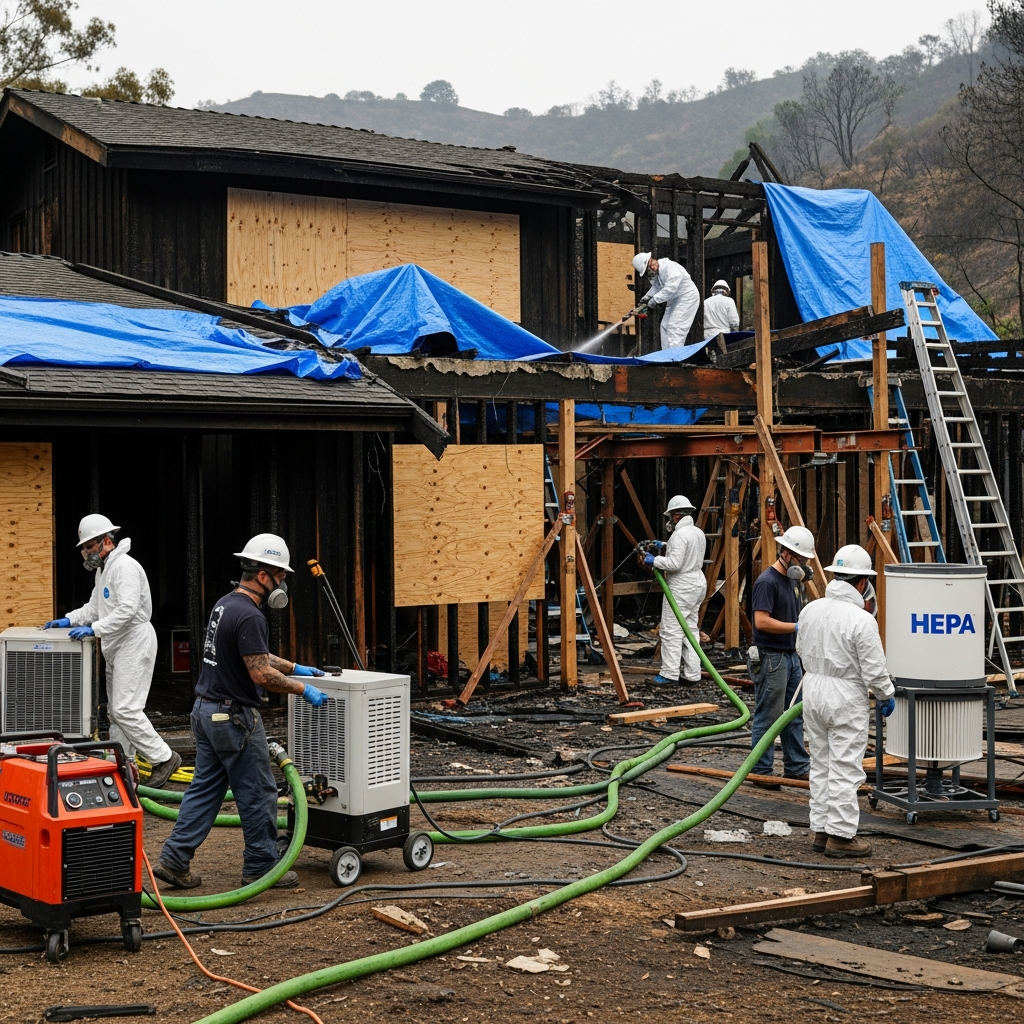
Containment, Air Quality, and Health Considerations
When inspection suggests opening materials, I plan containment zones to protect the rest of the home. In Malibu’s open-plan designs, that may mean temporary partitions to keep fine dust away from living spaces and to control airflow. HEPA filtration becomes part of the setup when we suspect mold growth or anticipate cutting or sanding. For homes built before certain dates or with known legacy materials, I factor in testing considerations to ensure safe handling of any disturbed components.
Air quality is as much a part of inspection as moisture mapping. If a musty odor pervades despite limited visible damage, I look for hidden pockets—behind shower walls, under stair landings, or within built-ins—that might not be obvious from a casual walkthrough.
Equipment Sizing and Placement Plan
Inspection culminates in a plan. How many dehumidifiers are needed to manage the moisture load in our coastal humidity? Where will air movers best create circulation without disrupting daily life? Can we leverage the home’s geometry—hallways, stairwells, and window positions—to accelerate drying? In Malibu, where outdoor air is often too humid to help, I prioritize closed-loop drying with careful door management and targeted venting.
For homes with delicate finishes, I choreograph equipment cords, protect floor transitions, and use non-marring tape. The plan also anticipates power needs and noise considerations, especially in neighborhoods that value quiet evenings and early mornings.
Documentation: Photos, Readings, and Communication
A strong inspection produces a paper (or digital) trail. I photograph conditions before any changes, record moisture readings by area and material, and sketch a simple map that shows affected zones. This record supports insurance claims and keeps everyone aligned on goals and progress. Homeowners appreciate seeing readings drop day by day; adjusters appreciate clarity about why particular materials were opened or preserved.
Communication continues throughout. If access holes are needed behind baseboards, I show exactly where and explain the purpose. If the plan calls for removing a section of wet carpet pad, I’ll outline how we’ll reinstall or coordinate replacement. Clarity reduces stress and helps the project move quickly.
Mid-Project Reinspection and Adjustments
Drying is dynamic. After 24–48 hours, I reinspect with the same rigor: repeat meter readings, re-scan with thermal imaging, and update the map. If an area lags behind, I troubleshoot—redirect air, add containment, or investigate an unresolved source. In Malibu’s variable weather, a sudden fog bank may require dialing back the use of outside air and increasing dehumidification capacity to maintain progress.
When readings drop into target ranges and materials stabilize, I document the final state and outline any repairs, such as baseboard reinstallation, touch-up painting, or refinishing a lightly cupped section of flooring.
Special Malibu Considerations: Salt, Sun, and Access
Our environment adds layers to inspection. Salt air corrodes fasteners and can seize valves and window hardware, leading to leaks that surprise homeowners on the first rainy day. Sun exposure bakes sealants brittle on the ocean-facing side while the canyon side remains supple, creating asymmetric vulnerabilities. Access along PCH and in tight canyon roads affects staging and may influence how containment is built to preserve pathways for household life.
These realities favor local experience. Inspectors accustomed to Malibu understand which flashing details commonly fail, which deck materials age fastest, and where water likes to hide in custom builds with unique transitions and materials.
When to Transition From Inspection to Action
The line between inspection and mitigation is thin by design. Once sources are identified and safety is confirmed, moving quickly into drying preserves materials and health. I recommend engaging seasoned help as soon as you suspect water intrusion that touches walls, subfloors, or insulation. With expertise grounded in our coastline, targeted water damage restoration can begin the same day as inspection, preventing a small event from turning into a major project.
Think of inspection as the blueprint and mitigation as the build. One without the other is incomplete; together they restore comfort, protect finishes, and return your home to its normal rhythm.
How long does a professional inspection usually take?
Most single-family homes can be thoroughly inspected in one to three hours, depending on complexity, access, and the scope of suspected damage. Larger or more intricate properties may take longer, especially when crawl spaces or multiple decks require detailed review.
Do you always need thermal imaging and moisture meters?
While not every situation requires every tool, meters and thermal cameras greatly increase accuracy. They reveal hidden moisture and help target interventions, reducing unnecessary demolition and speeding drying.
What if I can’t find the source of a stain that appears only during storms?
Intermittent, wind-driven leaks are common in Malibu. A combination of exterior inspection, controlled water testing under safe conditions, and careful interior mapping typically isolates the path. Upgrades to flashing or drainage often resolve these seasonal intruders.
Is it safe to open walls if mold is suspected?
It can be, with proper containment and filtration. Establishing a controlled work zone prevents spores and dust from spreading. Professionals also consider testing and safe handling protocols for older materials as needed.
Can I use outdoor air to help dry my home?
Sometimes, but Malibu’s marine layer often makes outside air too humid to be helpful. Professional drying typically relies on dehumidification and controlled airflow inside a closed environment, with brief ventilation windows when conditions allow.
What happens after drying is complete?
Once moisture readings confirm materials are dry and stable, repairs follow: reinstalling baseboards, patching drywall, painting, and addressing any finish work. Many homeowners also use the moment to complete small upgrades that reduce the chance of a repeat event.
Ready to move from uncertainty to clarity?
If you’re staring at a fresh stain or smelling something that shouldn’t be there, schedule an expert assessment rooted in local knowledge. With precise inspection and same-day water damage restoration when needed, you’ll protect your Malibu home’s comfort, character, and calm—whatever the skies decide to send our way.